However I've also had the opportunity to make things too. On Instagram I've seen photos of people having made items from Aneela Hoey's book of "Stitched Sewing Organizers" (sorry for the Americanism - it is a US published book). I bought the book back in August after FoQ as I couldn't see it there so had to be an Amazon purchase. This is the pic I took back then with some yarn I'd also bought at that time. It was when reading Jennie's Threads, whose blog I follow, that was the encouragement for me to have a go.
I haven't followed the SAL (sew along) as I've come into this late and I have also used what I've had and have probably not used the correct items to make what I have, but what I already have in stash. If you wish to know more the person who's organised the SAL, Penny of Tuppence Ha'penny Quits has details on her blog here.
It has encouraged me to jump in and make this small Handy Fold Up Pouch. It took a small amount of fabric and interfacing so was simple to do.
Front
Back
As you can see if has a flap that goes into a band on the front and it a size handy for some threads, or ear-phones - something small. I've used this for some large needles for sewing up knitted items.
Next I made a small box container - the patters shows 2 small containers that fit into one larger and would be good as a stationary container. This small one now sits to the right of my sewing machine, just handy for holding binding clips, pins and other bits until I can put them away in their proper places.
I had some, think it's called Fast to Fuse, to provide the stiffness to the box shape and also has a fusible glue to attach the fabrics front and back. It was another simple project that just took an evening to do.
I also made a drawstring project bag, which had hexagon tabs at the end of the drawstrings.
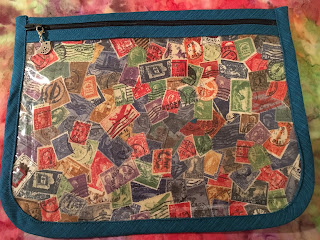
I then went on to make another project bag but this time one for keeping cut out pieces in for sewing so that they don't go wandering!
Front
Back
Binding
Although looking simple, this pouch involved vinyl, which I've never worked with but also making binding, which I have made previously but just joining strips end to end at an angle. This binding worked cutting a square to make half square triangles and rejoining to make a rhombus then rejoining again before cutting a continuous binding strip. Never made that before and took a bit of time to work it out but work it did and really pleased as it came in useful for this...Pieces for the Fold Up Folio, which has two side pockets with zips, another pocket inside, pincushion and needle book
Inside of the folio before being sewn to the exterior
Finished folio
All joined together from the inside
I had a disaster right when I was pressing for the last time that I forgot the vinyl pocket (at the top) and melted part of it, only a small bit, but I don't fancy taking things apart to repair. I may pretty it up with a bit of washi tape.
Of the five items made so far I think that the See-it-All pouch may be the most useful to me for all the little cut out pieces and may make some more in different sizes. There are more items to make so watch this space, but I am enjoying this book and even though I've made a lot of bags and pouches over the years there's still something new to learn.
I am currently working on the Boxy Pocket Pouch, which will be interesting attaching another zipped pocket to the side of a pouch. See how that goes.


