I'm back with a tutorial of how I make fabric postcards. If you've regularly read my blog you will know that I enjoy making these and have several try-outs in a small folder to try different techniques.
When I made the second sunflower postcard I took the time on Sunday to take several photos.
What I would normally do is design the front according to the theme of the swap back that with a fusible, like Bondaweb. Pelmet Vilene is used as a stiffener then another fusible layer onto which a pale fabric is fused to provide the back to write on. I make my cards bigger 6.5" x 4.5" then trim down to 6" x 4".
Here we go:
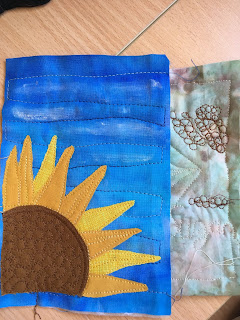
I would usually keep the front flat, but some backgrounds call for a bit of quilting so I've taken my background fabric and quilted with a variegated blue thread. There is a thin layer of cotton wadding but felt will also do. To give the effect of wispy cloud I used a white watercolour pencil and lightly brushed the wet pencil over the fabric.
I put fusible on the back of the fabrics for the flower
Then drawn some 'bottle' shapes for the petals and cut out
I used a cooking liner (you can used baking parchment) on my ironing board to arrange the petals and when happy with the arrangement I will press the pieces
This will just peel off and to be ironed onto the background as the fusible's glue is not affected by pressing onto the liner.
Then I will sew the appliqué pieces using normal straight stitch and open toe foot. The brown fabric is zigzagged around the rounded edge and then free machined in the middle. I'm afraid its the same colour thread to the sunflower centre so can't be seen easily (and it was difficult to see to sew too!).
Next step is to turn over and iron the fusible, then the pelmet Vilene, another layer of fusible followed by the fabric for the back of the postcard.
After that time to trim. I make postcards 0.5" bigger so I look for where it is best to trim to bring the size down from 6.5" x 4.5" to a standard 6" x 4".
When I am happy with this then I use a close zigzag stitch to close the edges together, I will go around the perimeter of the card twice, on the first time I reverse stitch when I get to the corners.
I sometimes find there are wispy bits of thread from the fabrics but they get trimmed off to tidy up.
The finished postcard
And the back. Its pale enough to be able to see writing done on the back.
I write on this using a gel pen, but sometimes a pigma pen or even felt tip.
Unless there is a lot of embellishment I would make postcards to be sent in the post as is like a normal postcard would. If there is anything that is likely to catch in the postal machinery I will put the postcard inside a cellophane envelope.
I hope you've enjoyed the tutorial (just hope I've covered everything!) and if you have any queries or comments just drop a line in the Comments.


Thank you for the tutorial! Your postcard is lovely.
ReplyDelete